Chocolate and Vanilla Mousse Cake
WordPress database error: [Disk got full writing 'information_schema.(temporary)' (Errcode: 28 "No space left on device")]SHOW FULL COLUMNS FROM `wp_options`
WordPress database error: [Disk got full writing 'information_schema.(temporary)' (Errcode: 28 "No space left on device")]SHOW FULL COLUMNS FROM `wp_options`

Last week, I took part of a baking contest organized by the shopping mall Leidsenhage (to be named The Mall of the Netherlands in the future) in Leidschendam. The food market of this shopping center is called Fresh! and for its inauguration, a baking contest had been organized. We had to fill an online form and say what pie or cake we wanted to bake, explain why and also say why we should be selected for the finale. Few days later, I received an e-mail telling me that I had been selected as one of the 25 candidates chosen for the finale. Yeaaahh!!! well… I have to bake the cake now, it has to be as I have described it in the registration form, on a day I may not feel like baking (yes, it happens) and there will be a lot of people looking at me and maybe the local press and and and… Am I stressing now? Noooo… It’s not like I hate being the center of the attention or surrounded by crowds 😆 . Okay, I may be a little introvert when I don’t know people or how things will turn out but I love baking and it is often good to get out of your comfort zone, right? After all, it’s just a contest and if I don’t win, I’ll just go on with my life and keep baking.
Well, guess what? I won!!!!! and it was not that easy because there were a lot of other nice cakes there. Mine was maybe not the best looking one but the jury apparently loved its taste. The jury members were Robert van Beckhoven (from the TV show Heel Holland Bakt), René Bogaart (a restaurant owner) and Cees Jan van Maanen (director of the bakery Van Maanen, also present in the shopping mall).
They gave our cakes a mark for presentation, technique and taste. I got an 8, a 8.5 and 9’s but I don’t know which mark was for what or from whom.
It was a very nice experience and I met really nice bakers there. I only regret that everybody went away once the pictures were taken and gifts given (every candidate got a recipe book, I got a voucher for 1-day training in the bakery of Robert van Beckhoven). I thought it would have been awesome to have some time to try each other’s cakes and discuss our personal experience but I also know some people were coming from far so they wanted to go home. It also ended at 13:00 so we were all hungry I guess.
But I stop talking now and give you the recipe of the cake I made. The vanilla layer is from the blog of Chloe delice, the mirror glazing from Empreinte Sucrée‘s blog, the rest is mine based on several recipes I’ve tried for different other cakes.
Ingredients :
Almond dacquoise
- 90 gr of almond powder
- 100 gr of icing sugar
- 15 gr of flour
- 3 egg whites (keep the yolks for later)
Praline crunchy layer
- 60 gr of milk chocolate
- 75 gr of praliné (I used the Barry brand)
- 65 gr of “crepes gavottes” (I found those only in France, you can use corn flakes or Rice Krispies
Vanilla layer
- 190 gr of liquid cream
- 1 vanilla pod
- 2 gr of liquid vanilla
- 20 gr of sugar
- 50 gr of egg yolks
- 2 gr of gelatin (1 or 2 sheets depending of their size)
Chocolate mousse
- 3 egg yolks + 1 egg white
- 50 gr of sugar
- 200 gr of dark chocolate
- 400 ml of liquid cream
- 1 big spoon of mascarpone
Mirror glazing
- 150 gr of sugar
- 150 gr of glucose
- 80gr of water
- 100 gr of sweet condensed milk
- 150 gr of dark chocolate
- 9 gr of gelatin (4 of 5 sheets)
Special material :
- 2 baking rings (20 and 22 cm)
- piping bag
- a thermometer (for the vanilla layer and the glazing)
- a kitchen robot and a standing mixer
First of all, you will have to freeze the cake before pouring the glazing on it and it then needs to thaw in the fridge for at least a night so organize yourself. Let’s say you will need time over 2 or 3 days.
Start with the vanilla layer as it needs to be frozen to be put inside the chocolate mousse.
Place the gelatin in a bowl of cold water.
In a pan, bring to a boil the cream, the vanilla seeds, the liquid vanilla and the sugar. In the meantime, whisk the egg yolks briefly. Once the cream starts boiling, pour it slowly over the egg yolks while stirring. Pour everything back in the pan and warm it up until it reaches 85 C.
Then, filter the preparation and let it cool down at room temperature a bit (it should be lukewarm but warm enough to allow the gelatin to melt). If you don’t wait, the temperature will be too high and the gelatin will not set the preparation while cooling down.
Add the gelatin and mix until it is completely incorporated.
Cover the 20 cm ring with plastic foil so that the bottom part of the ring is completely flat and sealed. Pour the vanilla preparation in the ring and place it in the freezer.
If you have prepared this in the morning, you can do the rest except the glazing in the afternoon, otherwise the day after.
Prepare then the “dacquoise amande”. First, prepare a baking sheet with baking paper on which you have traced a circle of 20 cm.
Sift the flour with the almond powder and half of the icing sugar. Then, whip the egg whites. Once they get white and foamy, add the other half of the sugar and keep whipping until thei are firm. Stop the robot and add the flour mix on top of the egg whites. Mix gently with a spatula until everything is well incorporated.
Put the preparation in a piping bag with a round nozzle (I used a size 13) and make a disc on the baking paper starting from the center. If it is not very regular or nice looking, it’s okay, it will be hidden in the cake. Just try to make it as even as possible.
Bake for about 12 min at 180 C. The biscuit should be lightly brown on the top. Leave it cool down at room temperature. Then place it in the 20 cm ring. If it is too big, cut the excess of biscuit out.
While cooling down, prepare the praline layer.
For the praline layer, melt the milk chocolate in a bowl au bain-marie. In the meantime, break the “crepes gavottes” and put them in a bog bowl.
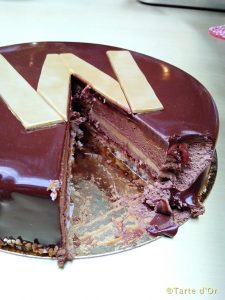
Once the chocolate is melted, add the praliné and stir until combined. Pour the mix on the biscuits and mix well until everything is covered with chocolate. Put that preparation on the almond dacquoise and using a small spoon, spread it evenly all over the dacquoise. Leave that in the freezer until set.
Prepare the 22 cm baking ring by putting some acetate roll on the inside of the ring. That will help to remove the frozen pie from the ring. Place the ring on a flat surface like a wood or plastic cutting board that you previously covered with plastic foil.
You can now prepare the chocolate mousse.
About 15 min before, place the mascarpone, the cream, the bowl of your kitchen robot and the whisk in the freezer (or at least in the fridge for the bowl and the whisk if you don’t have enough space).
Put the egg yolks and the white in a big bowl. Whisk them with the sugar until white and foamy.
At the same time, melt the chocolate in a bowl au bain-marie on one side. On the other side, start whisking the cream with the mascarpone.
When the chocolate is completely melted, pour it slowly on the egg mix while stirring to prevent the eggs to cook.
Then add the whipped cream in several times with a whisk.
It is now time to start building our cake upside down.
Pour about half of the chocolate in the 22 cm ring. Using a spatula or a spoon, make sure the whole surface on the board and the side of the ring are covered. it happens very easily to get bubbles of air inside the mousse.
Then add the frozen vanilla layer on top of the mousse. Make sure that the sides are properly filled in with chocolate mousse.
Add the rest of the mousse (keep 2 or 3 spoons to fill in the gap at the end).
Then put the dacquoise with the praline layer (they should have sticked together) upside down on the mousse so that the bottom part of the dacquoise is now the top of the cake. Press gently into the mousse. Fill in the eventual gaps on the sides.
Place the pie in the freezer for a night (at least 5 or 6 hours).
For the mirror glazing, you can prepare it on the same day, store it in the fridge and warm it up before using it or wait for the following day and use it right away.
To prepare it, put the sugar, the glucose and the water in a pan and bring it to a temperature of 103 C. In the meantime, put the gelatin leaves in a bowl of cold water.
Cut the chocolates in small pieces and put them in a big bowl.
When the temperature in the pan has reached 103 C, remove the pan from the heat and add the condensed milk. Mix well with a spatula until everything is well combined and pour everything on the chocolate pieces. Let the chocolate melt for 1 or 2 min without mixing. Then mix it carefully with a spatula. You will most likely see some pieces left so mix the preparation with a standing mixer for few seconds. If you use the glazing right away, let it cool down until it reaches a temperature of 35C.
While cooling down, you can take the cake out of the freezer, remove the ring, the acetate and plastic foil and place it on a bowl over a baking tray (I cover the baking tray with aluminum foil to get rid of the excess of glazing more easily). Try to do this step at the very last moment, otherwise the chocolate mousse won’t be cold enough to support the glazing. I usually remove the ring and foils first, put the cake in the freezer again and prepare the baking tray with aluminum foil. Then I just have to put the cake on the bowl at the very last minute.
Once the glazing is at 35 C, pour it on the cake in circular movements to be sure to cover all the sides. The difference of temperature between the glazing and the cake will make the glazing set quite quickly so you have to be quick but calm :). As soon as you have poured all the glazing on the cake, remove the excess on the top with a big flat spatula in one movement. Try not to touch it too much after that or you will leave marks on the glazing.
Remove the excess of glazing that does not fall off with a spatula. Now, you thought that was the most difficult part… hahaha that was maybe the most technical part but the moment you are going to sweat a lot is coming : transferring the cake to your service plate! Using one spatula and your hand or 2 spatulas, you have to lift up the cake and transfer it to the service plate. So take a deep breath, lift up the cake (try to not touch the sides as much as possible) and place it on the plate. I find it easier to use one spatula and my left hand, I feel the weight of the cake better than with 2 spatulas. So I put down the cake on one side, pull out the spatula a little bit while holding the cake with 2 or 3 fingers as low as possible, then remove my hand but still hold the cake with the spatula, lift down the cake completely and then remove the spatula.
The glazing will most likely be a tiny bit damaged where the spatula was removed so most of time, I put crushed nuts all around the cake at its base to hide the imperfections. Depending on what flavors you used in the cake, you can use rasped coconut, a thin layer of fondant or chocolate pasta.
Leave the cake in the fridge overnight or at least 5 to 6 hours before eating it.

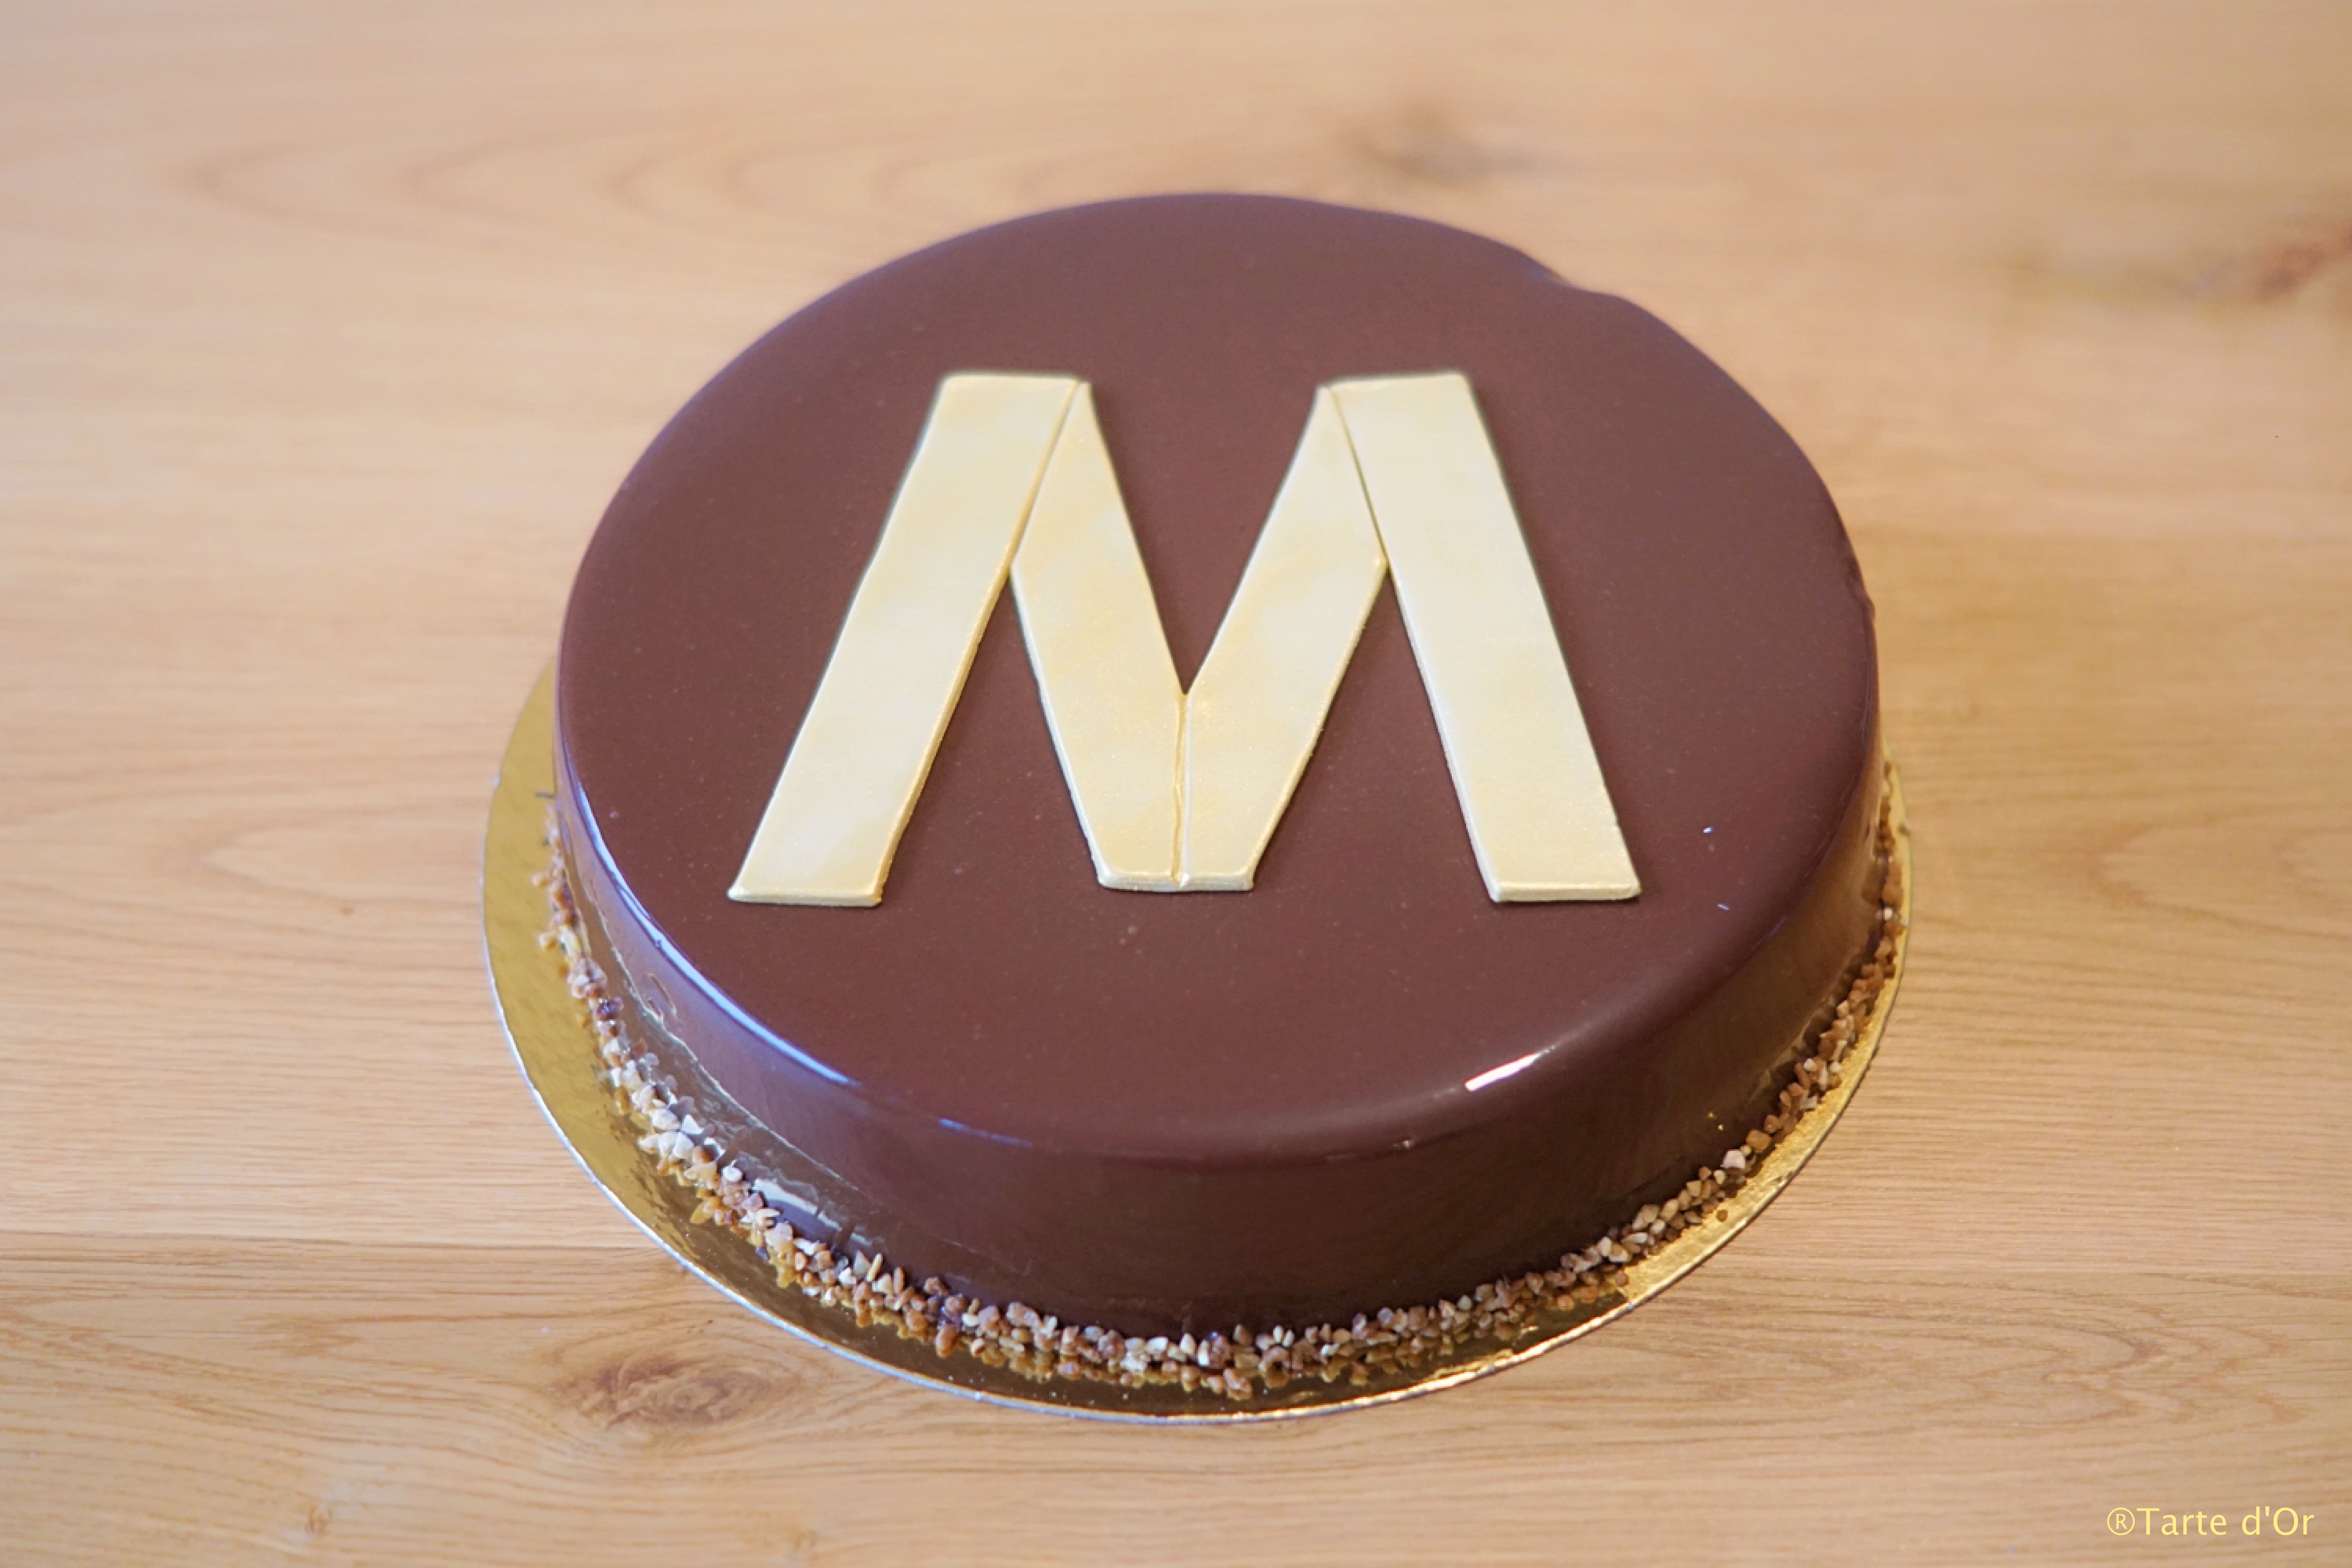
For the decoration, I chose to make a big “M”for “Mall of the Netherlands”. I printed the logo from the website of the shopping center and cut it out on baking paper. Then, I rolled out white chocolate pasta in a thin layer, cut out the logo and brushed it with gold powder.
I put the logo on the cake at the last moment before going to the contest. Again, if you choose to put decoration anywhere on the cake, remember that once it touches the cake, you won’t be able to move it.
Bon appétit !
Warning: mysqli_query(): (HY000/1021): Disk got full writing '.(temporary)' (Errcode: 28 "No space left on device") in /mnt/block-volume/var/www/tartedor/wp-includes/wp-db.php on line 2024
WordPress database error: [Disk got full writing '.(temporary)' (Errcode: 28 "No space left on device")]SELECT t.*, tt.* FROM wp_terms AS t INNER JOIN wp_term_taxonomy AS tt ON t.term_id = tt.term_id INNER JOIN wp_term_relationships AS tr ON tr.term_taxonomy_id = tt.term_taxonomy_id WHERE tt.taxonomy IN ('language', 'post_translations') AND tr.object_id IN (859) ORDER BY t.name ASC
Warning: mysqli_query(): (HY000/1021): Disk got full writing '.(temporary)' (Errcode: 28 "No space left on device") in /mnt/block-volume/var/www/tartedor/wp-includes/wp-db.php on line 2024
WordPress database error: [Disk got full writing '.(temporary)' (Errcode: 28 "No space left on device")]SELECT t.*, tt.* FROM wp_terms AS t INNER JOIN wp_term_taxonomy AS tt ON t.term_id = tt.term_id INNER JOIN wp_term_relationships AS tr ON tr.term_taxonomy_id = tt.term_taxonomy_id WHERE tt.taxonomy IN ('language', 'post_translations') AND tr.object_id IN (902) ORDER BY t.name ASC