Coconut Lime Raspberry Entremet
WordPress database error: [Disk got full writing 'information_schema.(temporary)' (Errcode: 28 "No space left on device")]SHOW FULL COLUMNS FROM `wp_options`
WordPress database error: [Disk got full writing 'information_schema.(temporary)' (Errcode: 28 "No space left on device")]SHOW FULL COLUMNS FROM `wp_options`

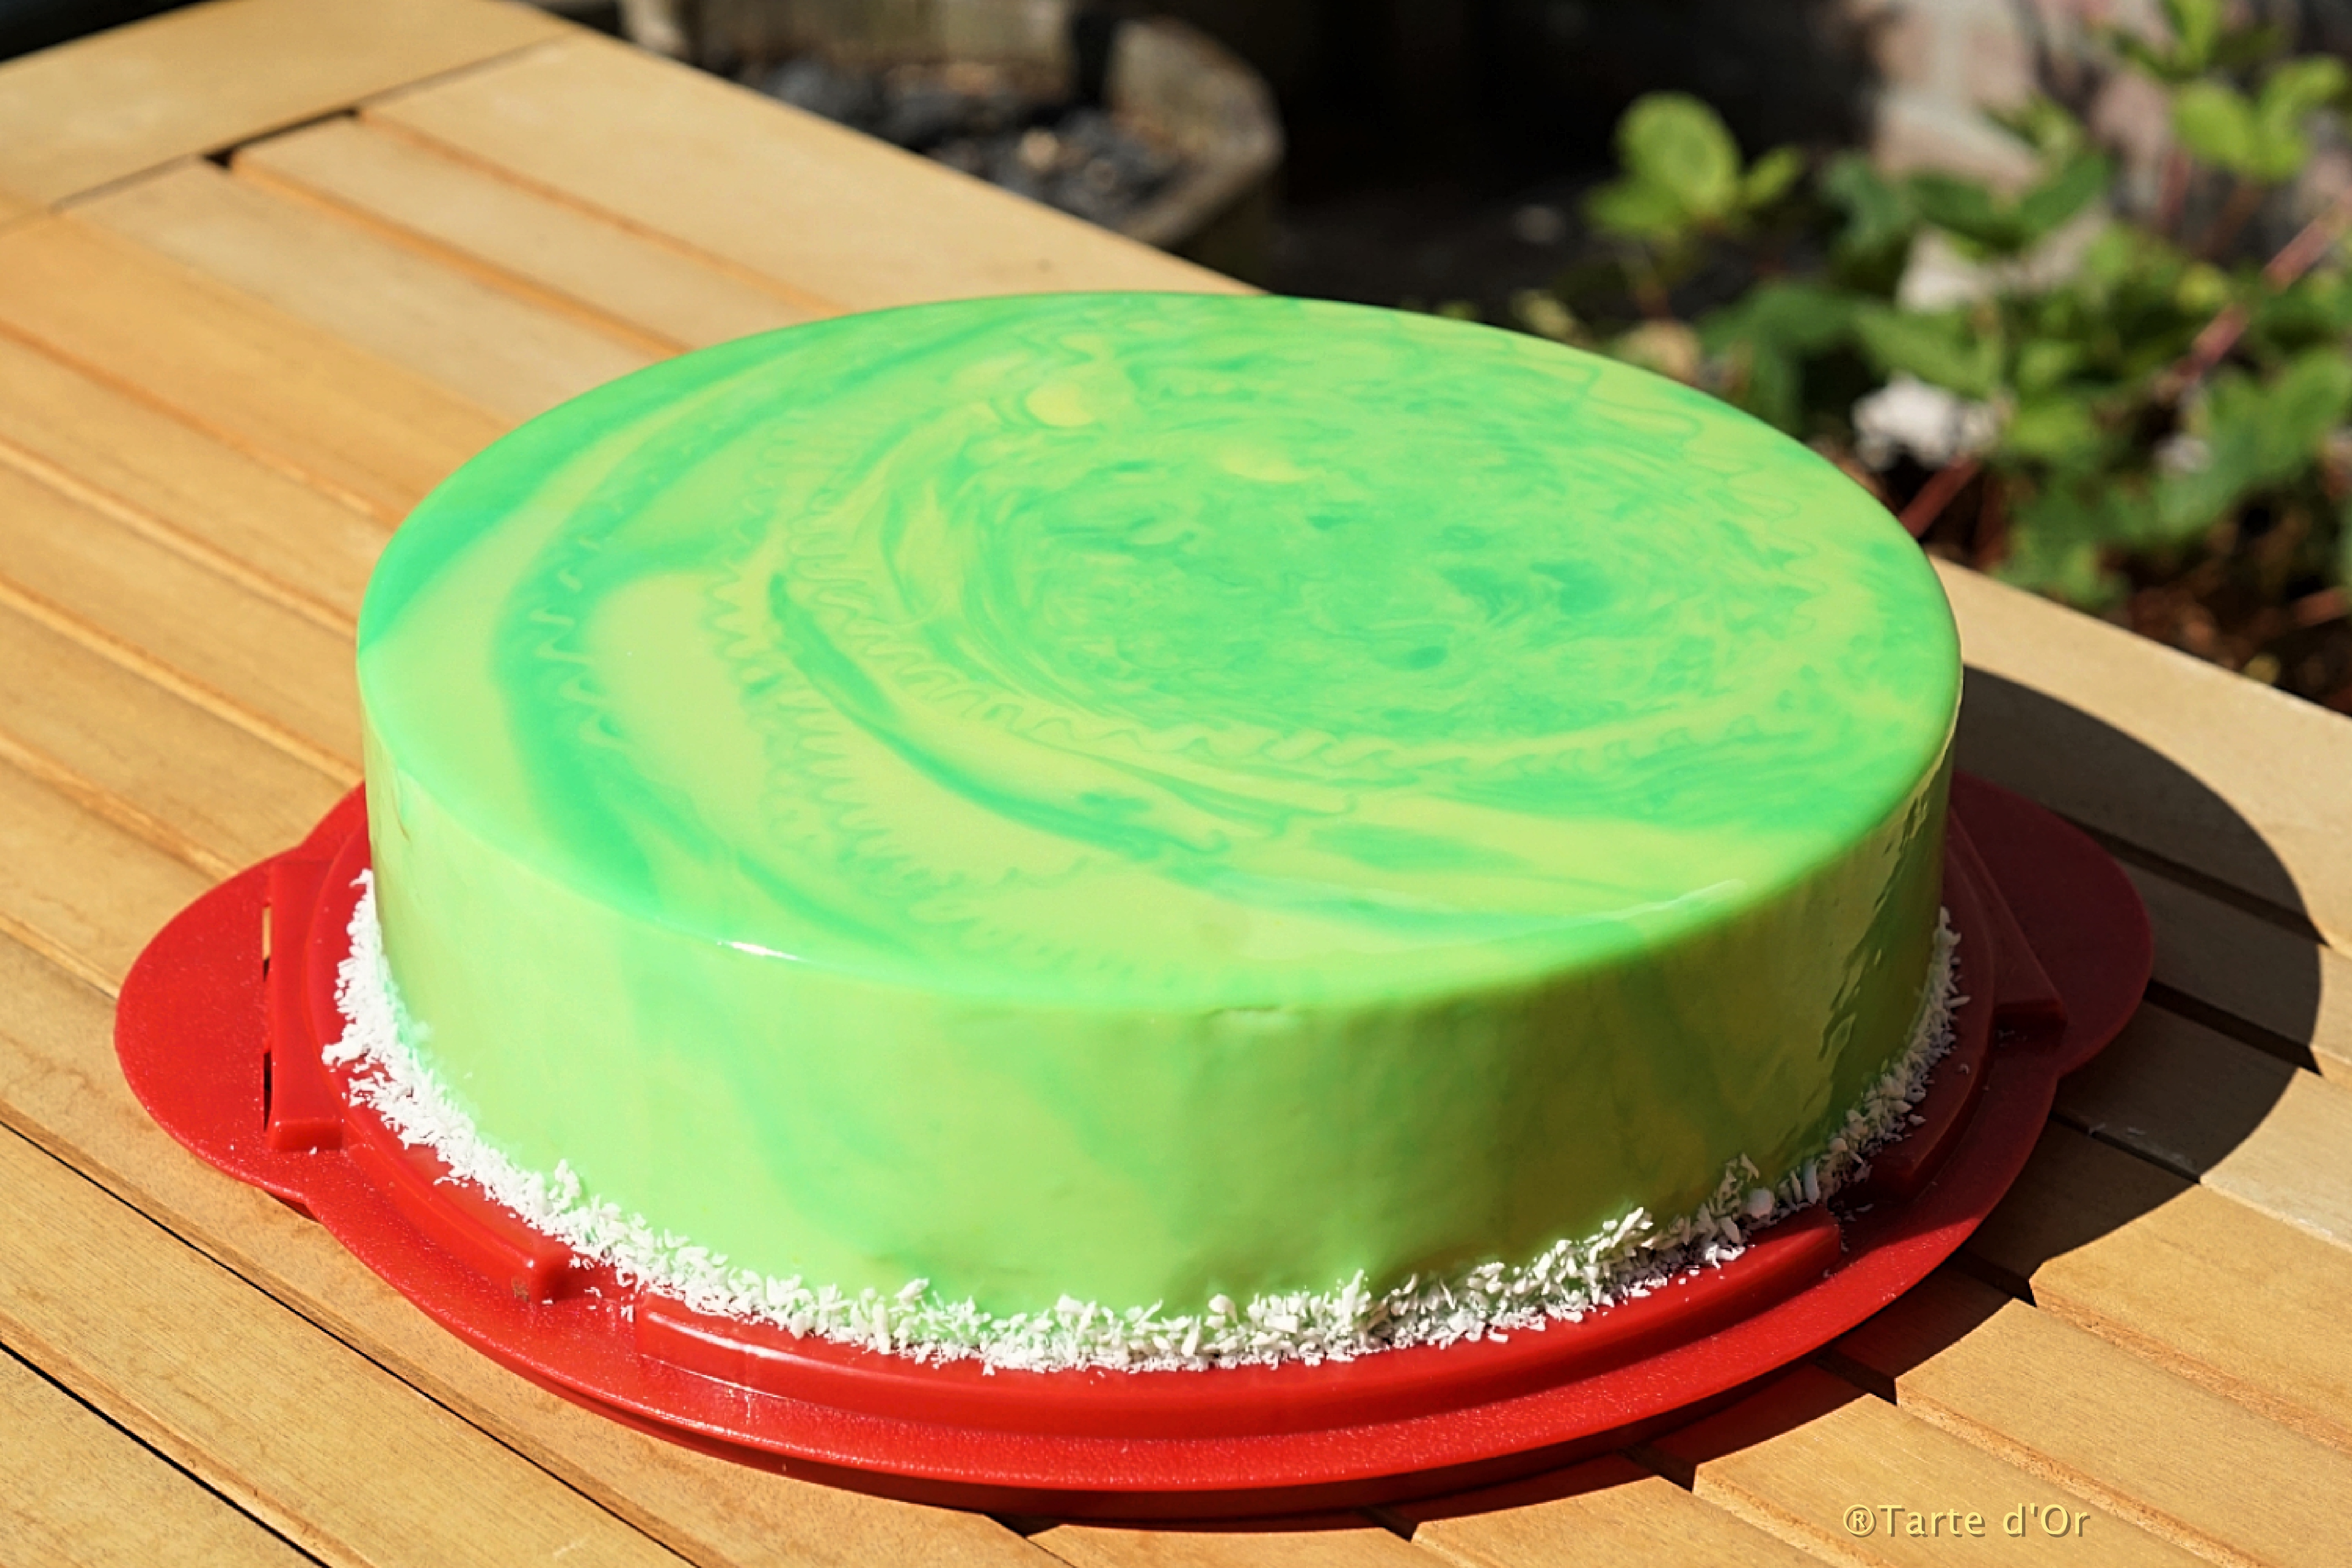
Summer is finally here and seems, for once, to like the Netherlands (Dutch people and expats will understand what I mean). To help you cool down a bit but also to celebrate a birthday last week-end, I made this sweet and refreshing mousse cake.
I, unfortunately, could not taste it but I have heard a lot of nice things about it. It was really fun to bake, I learned a lot with this recipe and, even though the mirror glazing did not turn out the way I wanted, it got a pretty nice marbled effect.
Note : you need to start at least 2 days before serving this cake
Ingredients (24 cm ring for the final cake, 20 cm ring for the biscuit and the insert) :
Raspberry insert :
- 500 gr of fresh raspberries (or 360 g of puree if you find it already prepared)
- 4 sheets of gelatine (7g)
Almond biscuit :
- 40 gr of almond powder
- 30 gr of flour
- 60 gr of sugar
- 50 gr of butter
- a pinch of salt
- 2 egg whites (60 gr)
- 1 lime
Crunchy coco layer
- 50 gr of “crepes gavottes” (I already talked about it in the Royal Chocolate recipe, you can replace that by corn flakes crushed in tiny pieces)
- 140 gr of white chocolate
- 50 gr of rasped coconut
Lime coconut mousse :
- 150 gr of coconut milk
- 4 limes
- 50 gr of rasped coconut
- 40 gr + 120 gr of sugar
- 4 eggs
- 5 sheets of gelatine
- 40 gr of water
- 500 ml of cream
Mirror glazing :
- 100 gr of sugar
- 100 gr of glucose
- 100 gr of sweet condensed milk
- 75 gr of water
- 150 gr of white chocolate
- 4 sheets of gelatin
- food colouring gel (I used green and yellow)
2 days before, start with the raspberry insert.
Put the gelatine in a bowl of cold water.
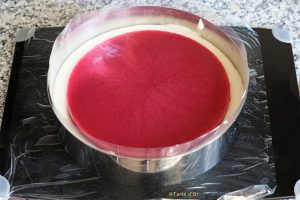
Put the 500 gr of raspberries in the blender and make a puree. Filter it once or twice to remove all the seeds. You will obtain something quite liquid but that’s normal.
Pour it in a pan and warm it up slowly until it starts boiling. Then, turn off the heat and add the gelatin. Mix until it is completely melted. Put some wrap foil inside your 20 cm ring to prevent any leaking, place it on a baking tray or a flat serving plate (I use a cutting board that fits perfectly in my freezer) and pour the raspberry mix inside. Put it in the freezer for the night.
The day after, prepare the cake.
I recommend to start with the first phase of the mousse. It will need to cool down at room temperature so you will have enough time to prepare the biscuit after.
Put the gelatine in a bowl of cold water.
In a pan, pour the coconut milk, the rasped coconut and the juice of the 4 limes and warm it up until boiling point.
In the meantime, separate the egg yolks from the whites.
Whisk the yolks and the 40 gr of sugar in a big bowl. Then add the warm coconut/lime mix while stirring. Pour everything back in the pan on a low/medium heat and keep mixing until it gets a bit thick.
Turn the heat off and add the gelatine. Leave it cool down at room temperature.
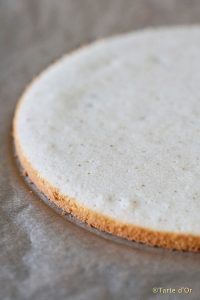
Then prepare the almond biscuit.
Melt the butter in a small pan and leave it on the heat until it gets a light brown color (do not let it burn though). Leave it cool down a bit at room temperature.
In a big bowl, mix together the dry ingredients : almond powder, flour, sugar and salt.
Add the 2 egg whites. Mix well and then add the melted butter. Mix again.
Finally add the juice and the rasped skin of the lime.
Pour this preparation in a 20 cm ring (you can use the one from the raspberry insert), placed on a baking tray covered with baking paper and bake for about 15 min at 180˚C.
Leave it cool down. You can slide a knife around the biscuit to prevent sticking but leave the ring in place.
Next step is the crunchy coconut layer.
Melt the chocolate in a bowl above simmering water. In another bowl, break the “crepes gavottes” or the corn flakes in tiny pieces and mix it with the rasped coconut.
Add the melted chocolate and mix well until the dry ingredients are all covered.
Spread this mix in a thin layer on top of the biscuit. You may not need to use everything. The thicker this layer is, the more difficult it will be to cut it when serving the cake so you don’t want it to be too thick.
Leave the biscuit and the coconut crunchy layer cool down completely. You can put it in the fridge to accelerate the process.
You can now finish the coconut/lime cream. The quantities scared me a bit because you have to first prepare an italian meringue and then add 500 ml of whipped cream and the bowl I used got filled to the top after I added the meringue so I though the whipped cream would double the volume but not that much. In the end, I got just enough for a 24 cm ring.
Boil the water with the 120 gr of sugar up to 118˚C.
When it reaches a temperature of 110˚C, you can start whipping the egg whites. They should get firm when the syrup is at 118˚C.
Lower the speed of the kitchen robot and pour the syrup slowly on the egg whites. Once everything is incorporated, put the speed high again and keep whisking until the temperature of the meringue has cooled down again.
Mix the meringue delicately with the coconut/lime preparation you had done earlier.
Then whip the cream (don’t forget to place the bowl, the whisk and the cream in the freezer for 10-15 min before). Add the cream to the preparation.
Time to build the cake now ! We will build it upside down to be sure that the top of the cake is flat.
On a cutting board or whatever flat plate/tray you use, cover the surface with plastic wrap and put the 24 cm ring on it. Put some acetate roll around the inside of the ring.
Pour some coconut/lime cream (about a 1/3 of the cream) and make sure it goes everywhere on the edges.
Then place the frozen raspberry insert in the middle and press gently.
Pour almost another 1/3 of the cream on top of the insert. Make sure the sides are well covered.
Then put the biscuit/crunchy layer upside down on the cream. Use the rest of the cream to fill up the sides.
Use a spatula to flatten the surface. Put everything in the freezer for the night.
Prepare now the mirror glazing.
Put the white chocolat in tiny pieces in a bowl. Put the gelatine in a bowl of cold water.
In a pan, warm up the glucose, sugar and water to a boiling water of 103˚C. Turn off the heat and add the sweetened condensed milk. Mix it well and pour it on the white chocolate. Let it melt without touching it, then stir with a spatula.
I had forgotten to add the gelatine (I should have added it just after the condensed milk) so I added it really at the end when the chocolate was already incorporated. It melted normally anyway and for once I did not even had to mix the preparation with an immersion blender! No little pieces of chocolate left !
If you want to make your glazing only with one colour, you could add the food colour now. I wanted to try 2 colours so I waited until the last minute.
The day after, take the cake out of the freezer and remove the ring and the acetate roll. Leave the cake in the freezer.
Warm up the mirror glazing above simmering water until it is completely melted. I poured half of the glazing in a different bowl and then added the food colouring gels. Just before pouring the glazing on the cake, I poured back half of the glazing to the other one without mixing.
Then leave it cool down to a temperature of 35-38˚C.
At the last minute, take the cake out of the freezer and place it on a bowl in a baking tray. Pour the glazing on top and make sure that all the sides are covered.
Remove the excess of glazing on top of the cake with a spatula. I did not do it this time because I wanted to keep the marbled effect.
I thought the contrast between the yellow and the green would have been more visible but in the end, it gave a nice green light marbled effect that reminds a lot the lime in the cake. Next time, I will pour the 2 glazing one after the other to see the difference.
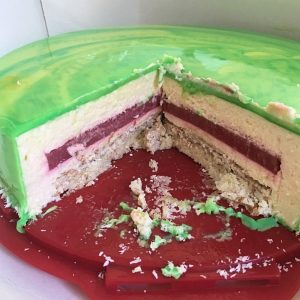
Here is a picture of the inside :
Bon appétit !
Warning: mysqli_query(): (HY000/1021): Disk got full writing '.(temporary)' (Errcode: 28 "No space left on device") in /mnt/block-volume/var/www/tartedor/wp-includes/wp-db.php on line 2024
WordPress database error: [Disk got full writing '.(temporary)' (Errcode: 28 "No space left on device")]SELECT t.*, tt.* FROM wp_terms AS t INNER JOIN wp_term_taxonomy AS tt ON t.term_id = tt.term_id INNER JOIN wp_term_relationships AS tr ON tr.term_taxonomy_id = tt.term_taxonomy_id WHERE tt.taxonomy IN ('language', 'post_translations') AND tr.object_id IN (758) ORDER BY t.name ASC
Warning: mysqli_query(): (HY000/1021): Disk got full writing '.(temporary)' (Errcode: 28 "No space left on device") in /mnt/block-volume/var/www/tartedor/wp-includes/wp-db.php on line 2024
WordPress database error: [Disk got full writing '.(temporary)' (Errcode: 28 "No space left on device")]SELECT t.*, tt.* FROM wp_terms AS t INNER JOIN wp_term_taxonomy AS tt ON t.term_id = tt.term_id INNER JOIN wp_term_relationships AS tr ON tr.term_taxonomy_id = tt.term_taxonomy_id WHERE tt.taxonomy IN ('language', 'post_translations') AND tr.object_id IN (811) ORDER BY t.name ASC